
To automate Instagram posts, prepare the creative and caption, approve the exact version, schedule it through a supported publishing route, and check the live result. For one professional account with finished content, start with Instagram's scheduler. Add a separate system when moving work between people or accounts is the real problem.
The mistake to avoid is calling a calendar entry a published post. A scheduled item tells you what should happen later. A live post link or platform media ID tells you what actually happened.
Start with a creative you can actually put in the queue
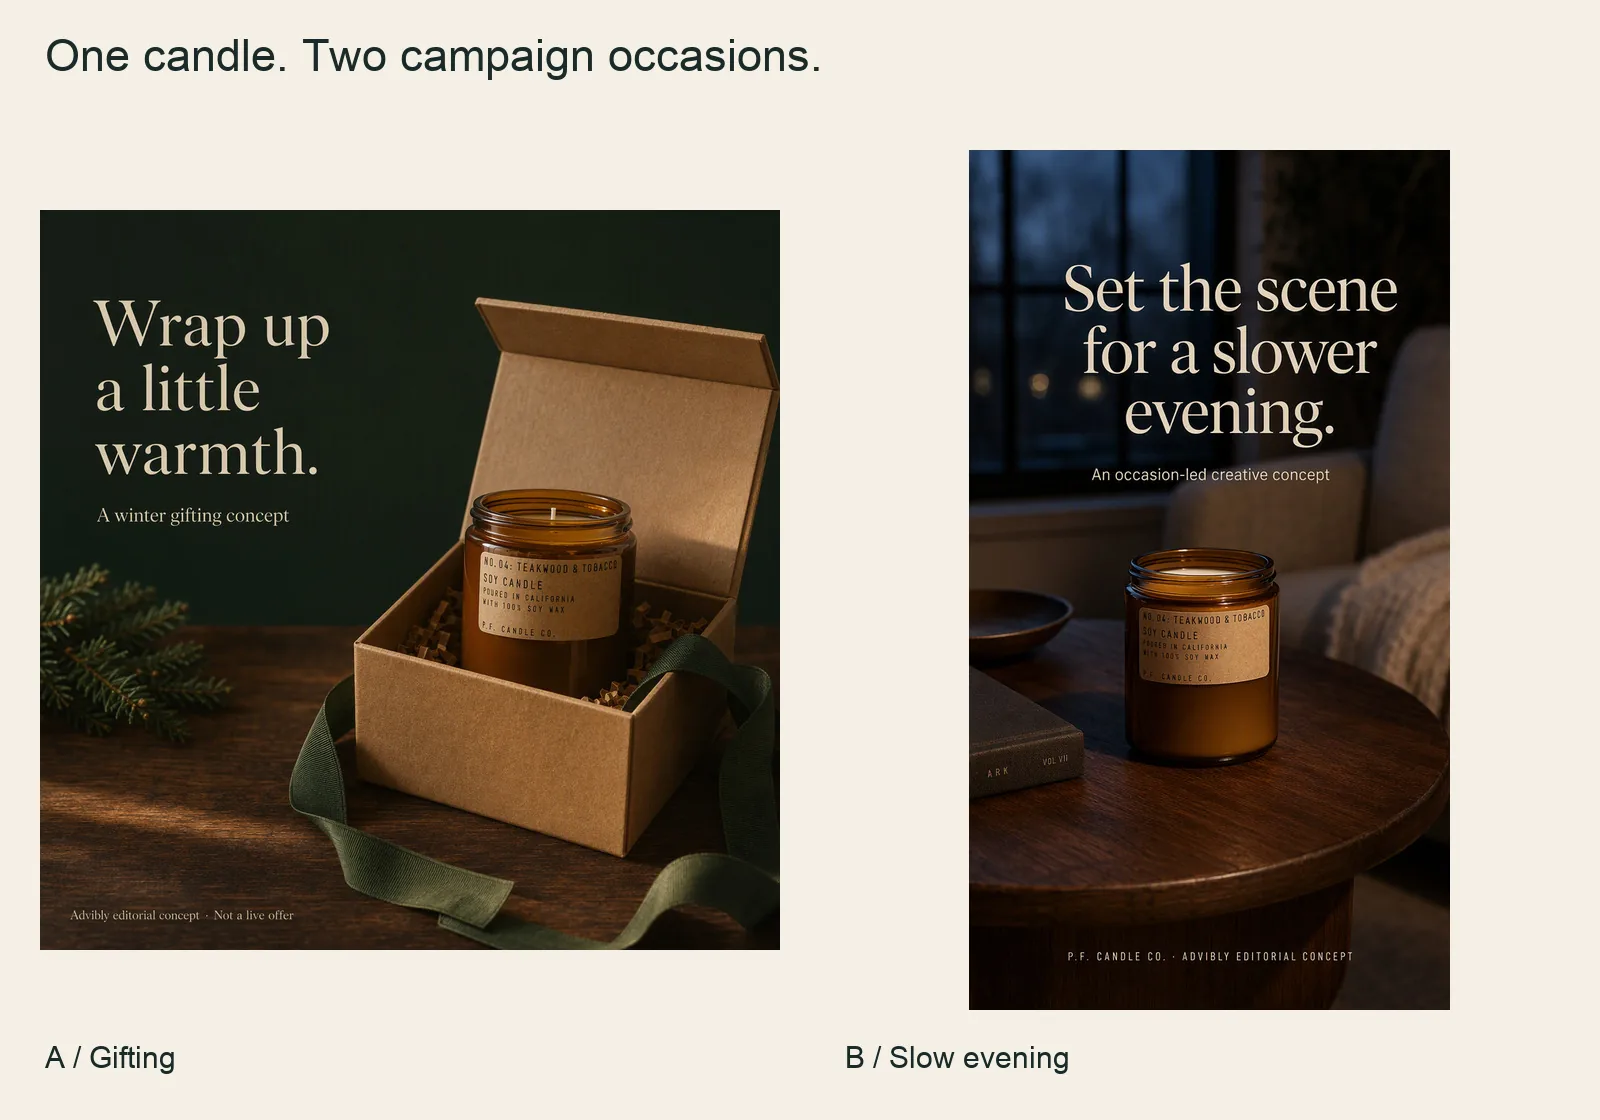
The same selected candle reference became two actual Advibly images: gifting and evening context. This is a creative choice, not an Instagram schedule or publication receipt.
P.F. Candle Co. Teakwood & Tobacco Standard Candle product source
Reproduce the useful part, then schedule the approved version
- Supply your cleared product image and protect the label and shape.
- Choose a product-led or occasion-led concept; inspect the returned file rather than assuming the prompt succeeded.
- Write the exact caption from real product facts. Props and conceptual offers do not establish a live promotion.
- Approve the file, caption, destination and time together. Then use the supported publishing route and verify its separate status.
Through a compatible MCP assistant, Advibly can connect creation with social post scheduling and status retrieval. A safe initiating brief is: ‘Use our saved brand and approved product asset. Propose one Instagram post with its exact file, caption, profile and time. Return it for review; do not publish yet.’ This describes a supported workflow to run, not a tool execution claimed for the examples above.
Generate your first creatives for free.
Starter credits cover eligible generation, not free publishing or a guaranteed number of posts. If your creative is already finished and you only need a release time, the native Instagram route below may be all you need.
This guide covers posting automation, not automated likes, follow/unfollow tools, or unsolicited messaging.
Choose among four Instagram posting routes
Instagram app: finished content, one operator. Start here if your main need is to prepare a post now and release it later. Your brief, asset files, and approval record can stay in a shared folder or spreadsheet. You don't need a custom integration to solve a scheduling problem.
Meta Business Suite: connected Facebook and Instagram work. Consider this when those are your main destinations and you want a shared Meta workspace. Select and inspect each destination separately; the same creative can need a different crop or caption. Use the Facebook scheduling guide for Page- and Group-specific constraints.
A connected scheduling system: repeated handoffs. This becomes useful when several people create and approve content, several brand accounts share a calendar, or approved files are repeatedly copied between tools. Test the exact account and format you need before committing a batch. “Supports Instagram” is not a complete format-support statement.
Custom API: a repeatable trigger worth maintaining. Choose this only if a developer will own authentication, media processing, errors, and duplicate prevention. A catalog update that reliably creates a reviewable post draft is a plausible trigger. An occasional Friday announcement usually isn't a reason to build a publishing service.
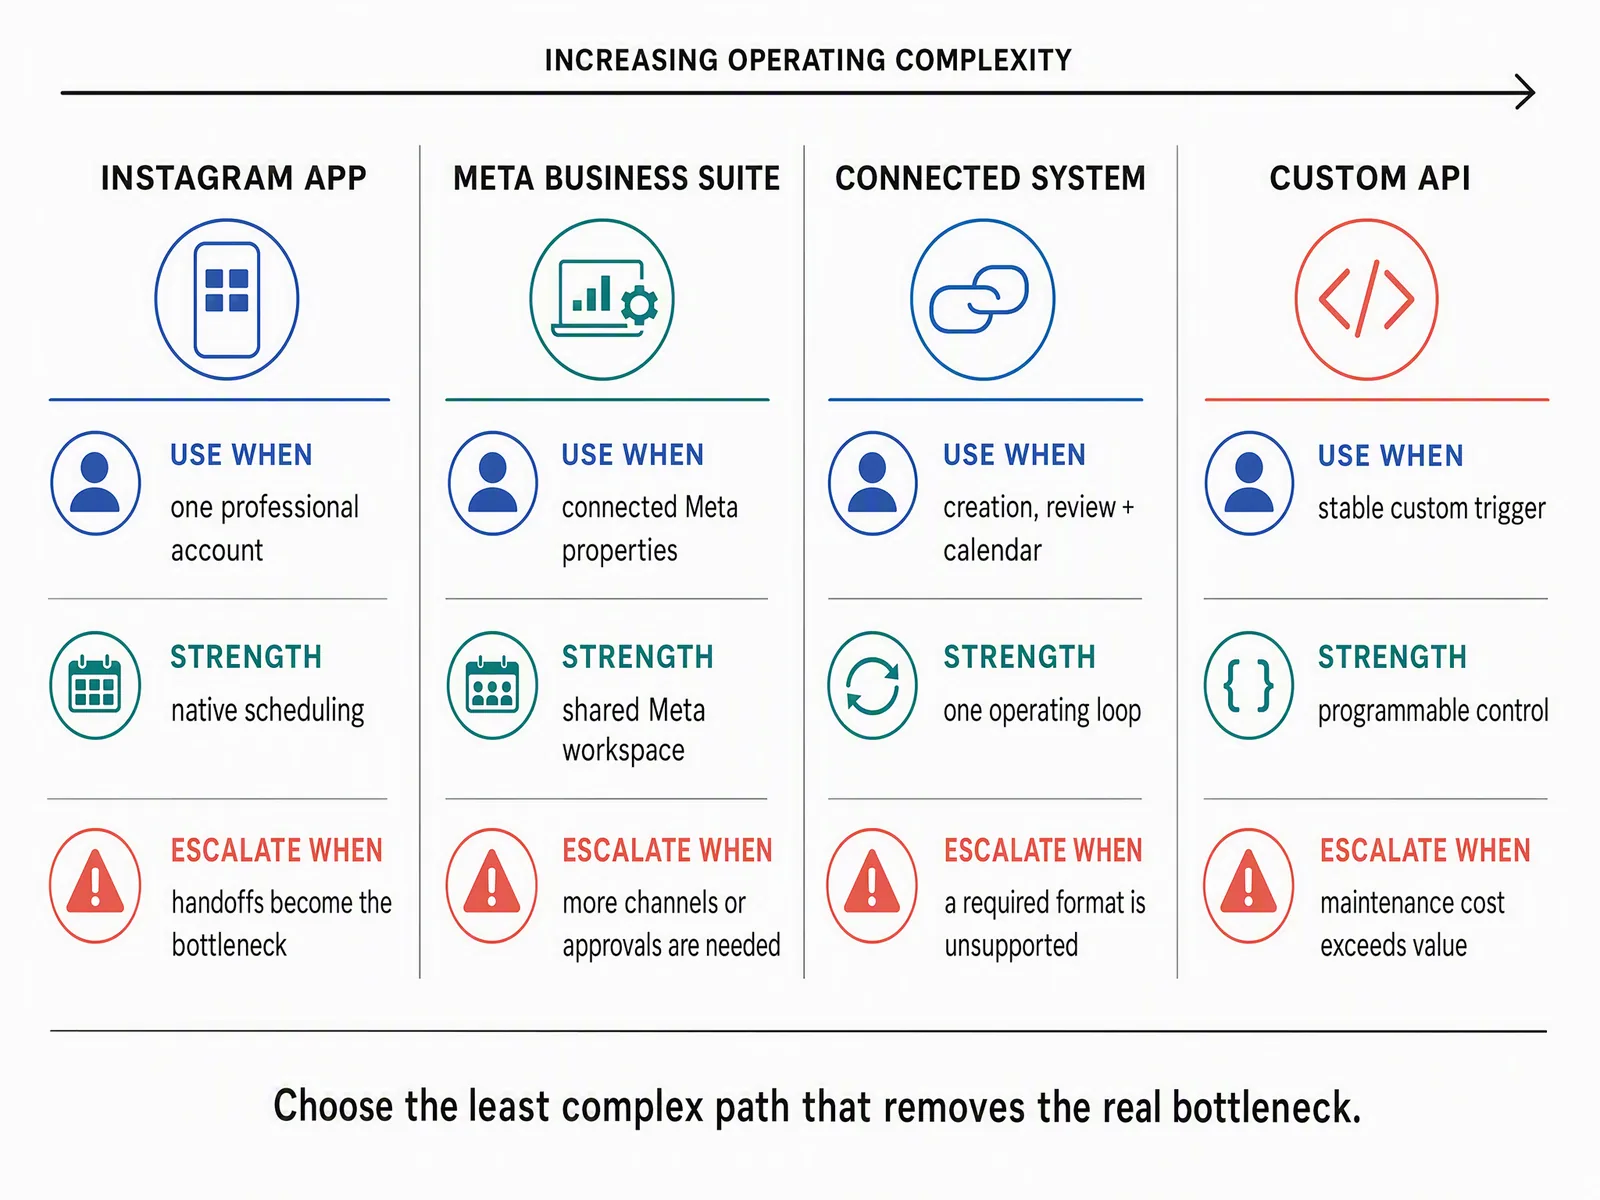
Editorial decision aid, not a feature-parity chart or scored tool ranking. The four route descriptions above provide the same selection guidance in readable text.
Before evaluating tools, write down the job you're trying to remove: “copy approved captions into the calendar,” “keep three accounts separate,” or “stop asking which file is final.” That sentence is a more useful selection criterion than a long feature list.
Set up a first scheduled post
Start with a low-risk post you genuinely intend to publish. Don't use a real audience as an unapproved software test.
In the Instagram app
Instagram's scheduling guidance describes scheduling supported posts and Reels from professional accounts. Its documented mobile route is to prepare the post, open the additional settings, choose scheduling, set the time, and confirm. Manage the result in the account's scheduled-content area.
The English help page required sign-in during the September 11 review. Menu names, supported features, and scheduling limits were not verified in a logged-in account. Check the controls shown for your actual post instead of treating an old “days ahead” limit or screenshot as current.
Use this preflight before confirming:
- Check the account handle, not just the profile picture.
- Open the final media and read the complete caption.
- Confirm that your required tags, collaboration, disclosure, audio, and format survive scheduling.
- Check the date, local time, and displayed time zone.
- Confirm the item appears in scheduled content, then record its identity and scheduled time.
If a required feature is unavailable, use a supported manual route or revise the post with approval. Don't silently remove a product tag or disclosure to make the scheduler accept it.
In Meta Business Suite
Open the correct business workspace and select the intended Instagram destination. Prepare the post in its composer, inspect the Instagram preview, choose the available scheduling controls, and confirm the scheduled item in the planner or content list.
Meta's Business Suite scheduling help is the authority for the current interface; it was access-restricted during this review. These are task-level steps, not a claim that particular buttons were tested today.
If both Facebook and Instagram are selected, review both previews before confirming. A successful job for one destination doesn't establish that the other published.
For Story-specific interactive elements or reminder-based delivery, use the separate Instagram Story scheduling guide. Feed-post support doesn't establish Story support.
Build one post record from creation through publication
The record below is a hypothetical small-team example, not a real campaign or platform receipt. It can be a spreadsheet row, a task, or an entry in your content system.
Example post: show how a notebook cover closes.
- Purpose: help viewers understand the closure before they visit the product page.
- Creative: a real product photo named
notebook-closure-v3.jpg; caption version 3. - Destination: the exact brand Instagram handle and account ID, recorded by the operator.
- Format: one feed image; no unsupported feature assumed.
- Planned time: September 18, 2026 at 10:00, Asia/Kolkata. This is an example appointment, not a recommended engagement time.
- Approval: reviewer name, timestamp, and explicit approval of version 3 plus its destination and time.
- Scheduled evidence: the job identifier or scheduled-item reference returned by the chosen tool. Leave this empty until scheduling succeeds.
- Publication evidence: the actual live URL or platform media ID, plus verification time. Leave this empty until publication is confirmed.
- Exception owner: the person who will investigate if the expected result is missing.
If the app exposes no job ID, keep its available scheduled-item reference or a privacy-safe screenshot with account, media, and time. Don't invent an ID. A screenshot of the queue still isn't a publication receipt.
The useful detail is that the asset version and the scheduling evidence travel together. If a teammate asks “Did this go out?”, they should not have to search a chat thread, a downloads folder, and two calendars.
Put approval at the point where the post can still be stopped
Approve the complete release package immediately before scheduling. Earlier feedback on a concept isn't approval of a final caption, offer, or account.
For the notebook example, a reviewer should inspect the closure photo at its intended crop, check that the caption describes the real mechanism, and verify the destination. An attractive generated image would not be proof of how a physical closure works. Use actual product material for that claim.
If you are still deciding what the post should show, the Instagram post ideas guide belongs upstream of this approval step. A scheduler cannot resolve an unfinished brief.
Material changes invalidate the old release decision. Examples include swapping the image, changing an offer, replacing a caption, changing a disclosure, or switching the account. Recheck the scheduled item after editing or replacing it. If you replace a job, confirm the old one is cancelled so both cannot run.
You don't need several ceremonial approvals. You need one clear release decision tied to the exact version that will be submitted.
Give each publishing state a distinct meaning
The following is an editorial operating model, not Meta's official state machine. Adapt the labels to your system without losing the distinctions.
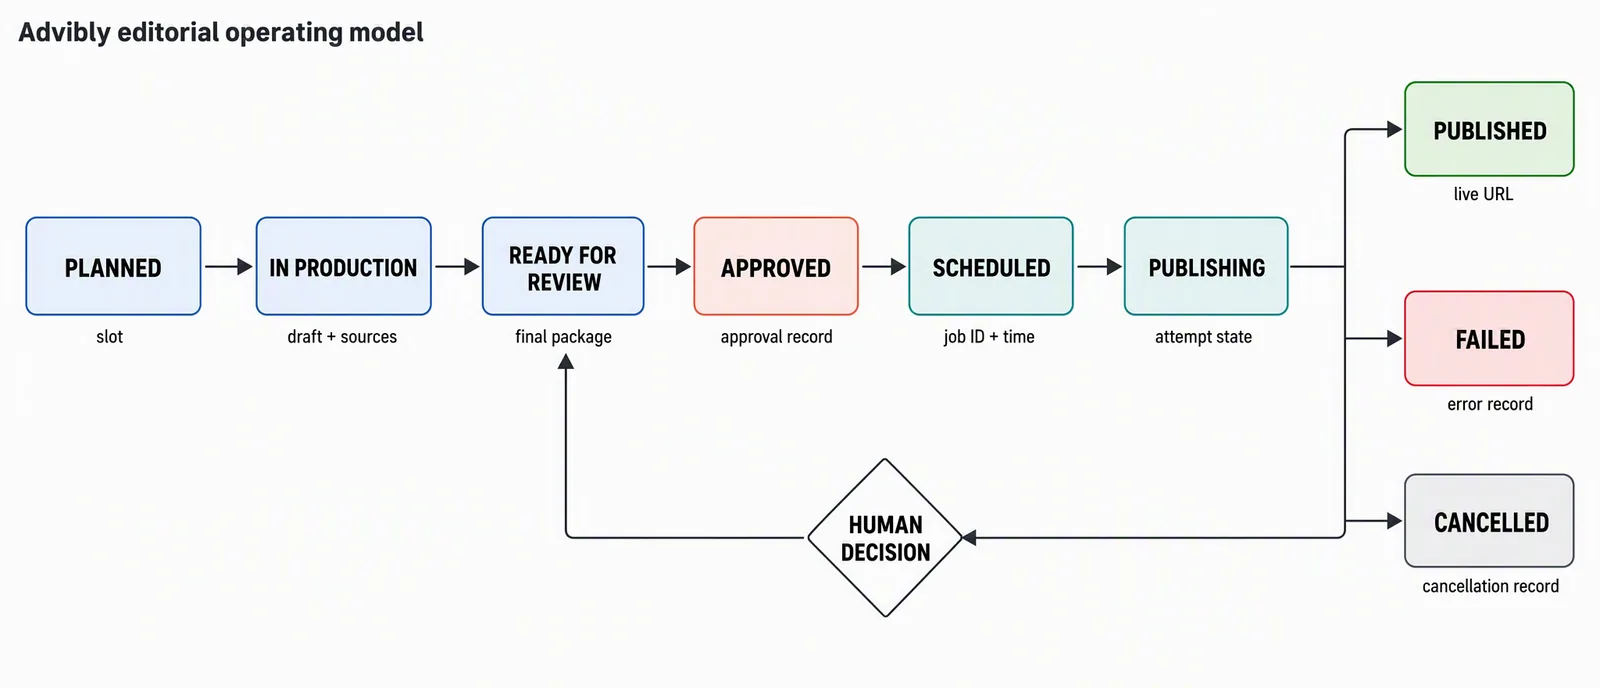
Scheduled, publishing, and published are different states. The human-decision branch is for exception handling, not an automatic retry. Cancellation applies to a job that can still be stopped; it does not undo an already-live post. The definitions below are the text equivalent.
|
State |
What you can truthfully say |
|---|---|
|
Planned |
The team has chosen the subject and assigned an owner. |
|
In production |
The asset and caption are being made. |
|
Ready for review |
The complete proposed post is available to inspect. |
|
Approved |
A named reviewer released this exact version. |
|
Scheduled |
A system has accepted a job for a specified account and time. |
|
Publishing |
An attempt has started; its final result is not yet confirmed. |
|
Published |
The platform reports the published media, or the live post has been verified. |
|
Failed |
A failure is recorded and someone owns the next decision. |
|
Cancelled |
The pending job was stopped, with confirmation retained. |
Keep ambiguous outcomes distinct from confirmed failures. “The request timed out” describes your connection; it does not necessarily describe Instagram's result.
What changes when you use the Instagram API
The API route requires a supported professional account, the correct login and permissions, and a maintained application. Meta documents both Facebook Login and Instagram Login routes; don't mix permissions or account-linking requirements between them. Start from Meta's official Instagram API collection.
For a Reel, the documented sequence is to create a media container, inspect its processing status, then call media_publish with that container's ID. FINISHED means the media is ready for publication, not that it is live. The publish response returns a media ID. Keep the container and published-media identifiers separately.
This is an architecture outline, not a runnable integration tutorial. Your application still needs permission setup, credential storage, current format checks, durable records, and a named operator. Keep tokens in a secret store, never in the content calendar or client-visible captions.
Avoid duplicate requests and expired media
Two workers can pick up the same approved item if your application has no concurrency control. Use an internal unique key for the approved version, account, and intended release; make the database claim for that item atomic. This is an application design recommendation, not a claim that Meta accepts an idempotency key for publishing.
Don't mark the item complete when your worker sends a request. Store the attempt, then reconcile its outcome. If the worker restarts, it should inspect the existing attempt before creating another container or publish request.
Meta must be able to retrieve media used in the documented URL-based publishing flow. A temporary file link that expires before processing finishes can break an otherwise valid job. Keep the approved media available through processing, then apply your retention policy. Check the official publishing request guidance for the chosen flow's current limits and supported features.
Recover a failed or ambiguous post without guessing
No schedule option: check the account type, connected destination, and the chosen post's required features. Resolve the unsupported condition; repeatedly pressing the same control won't create support.
Authorization error: assign the account owner to restore access through the supported connection flow. Don't ask a teammate to paste credentials into a shared task. Revalidate the account before rescheduling.
Media stuck processing: inspect the platform state and whether the exact media remains accessible. Repair format or hosting issues before a new attempt. A new creative file needs review if its visible content changed.
Timeout after submission: pause the retry. Inspect the returned job or container state and the destination account. If the post exists, record it and stop. If publication is still in progress, monitor that attempt. If it is definitively failed, repair the cause and create one controlled attempt. If you cannot determine the outcome, leave it unresolved for the owner rather than guessing.
Wrong version scheduled: stop the pending job where possible, correct the release package, and reapprove. If the wrong post is already live, treat editing or removal as a separate incident decision. Calling the old job “cancelled” doesn't remove public content.
The recovery rule is simple: determine what happened before deciding what to do again.
Confirm the first complete cycle before filling the month
After the intended release time, open the actual account or inspect the platform's published-media result. Match the creative, caption, destination, and result to the approved record. Record the live URL or media ID and the verification time.
Only then scale up the calendar. A first successful image post proves that account-and-format path at that time; it doesn't prove Reels, Stories, every account, or every scheduling feature. Test each materially different route with approved content.
If creation and review handoffs are still the slow part, use a creation-to-publishing workspace to make the assets, place approved posts on the calendar, schedule and publish them, then review their analytics. The workflow can continue after the post goes live instead of ending at the Schedule button.
Use those results to plan the next creative: decide which message to repeat, which execution to revise, and which question the next post should answer. Keep the account, approved version, and publishing result attached to the content so the team knows which execution it is evaluating.
Your first automation milestone is not a full calendar. It is one approved post that reached the correct account, with enough evidence to explain both the successful path and what you would do if it failed.